Overview
The Members page of MemberPress allows you to view all of your member's data in one place, and it also gives you the ability to
manually add members to your site. Here however, we will mainly be discussing the type of information that you will see on your Members page and how to use it, from top to bottom.
Using the Screen Options
The Screen Options of WordPress can be accessed by clicking this little drop down option near the top right of the page:
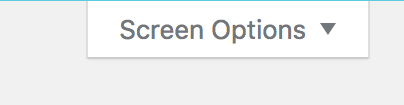
When clicking that, you will be able to see each option discussed in the ‘Understanding the Members Table' below. If you don't care to see a certain column in the Members Table, just uncheck it here.
You can also use the ‘Pagination' option to select how many members you would like to show up on the page. When the limit is met at the bottom of the table, you will need to use the page scroll option below the table to see more data.
Then, click the ‘Apply' button to apply your changes.
(Helpful hint: use this setting to select a specific number of records to export with the export feature explained in the last section below).
Filtering Members
Our filtering tool found above the Search option can be used to filter your table to show you information about any membership on your site.
Simply use the first drop down to select the membership (only published memberships will appear) and the second drop down to select if you want to see ‘All Members', ‘Active Members', ‘Inactive Members', ‘Expired Members', or only ‘Non-Members' (anyone who abandoned signup or has not paid for anything successfully) for that membership.
All Members: All WordPress users.
Active Members: Users that currently have an active subscription to at least one membership.
Inactive Members: Users that have previously subscribed to a membership but currently do not have any active memberships.
Expired Members: Users that are inactive or expired on at least one membership. They may have an active subscription for a different membership.
Non-Members: Users that have never subscribed to any membership.
Then click the ‘Go' button to see the results in the table below.
(Helpful hint: use this setting to sort out specific memberships (active or inactive members) to export their data with the export feature explained in the last section below).
Searching Members
The search tool found directly above the Members Table and to the right, gives you the option to search from the following fields on the Members Table: Username, Email, First Name, Last Name, ID, or Any (slow).
To use this feature, simply use the entry box to enter what you would like to search for, and then select the appropriate option from ‘by Field' drop down menu.
Understanding the Members Table
Here is a list of all the fields that show up on the Members Table and what you might see in them:
| Field Name | Description |
| Id | The user ID for the member. |
| Username | The username of the member. Username is clickable to edit the user. Hovering over it will reveal an option to edit and delete the user. |
| Email of the member. | |
|
Status |
Possible options are:
Active – has access to protected content based on membership |
| Name | First and last name of the member. |
| Subscriptions |
Will show how many subscriptions the member has and what their rebill status is from one of the following options:
Enabled – automatically recurring billing is set The displayed options are clickable and will take you to the subscription(s) that fit that description. |
| Transactions |
Shows how many transactions the user has and under what status they are:
Complete – any completed transaction that is not expired The displayed options are clickable and will take you to the transaction(s) that fit that description. |
| Active Memberships |
Will list the name of the active Membership(s) that the user has subscriptions to. |
| Inactive Memberships | Will list the name of the inactive Membership(s) that the user has subscriptions to. |
| Last Login | Displays the date of the member's last login, or Never if they have yet to login after registration. |
| Logins | Displays the total number of logins for each member. |
| Value | Will show the total amount that the member has paid you over their lifetime. |
| Registered | Displays the date the member first registered on your site, regardless of membership. |
Exporting Members Data
At the very bottom of the Members page you'll see two options for exporting:
![]()
Export all as CSV – click this link to export only the records shown on the page you are currently viewing. (See the Helpful hints near the bottom of the ‘Using the Screen Options' and ‘Filtering Members' sections above to pull more specific results.)
Export table as CSV – click this link to export all of the members info on your site as a CSV file. This option also includes all custom fields for each Member.


