This add-on is included with your purchase of the Basic, Plus or Pro edition of MemberPress.
Tutorial Video:
Step 1 – Install PDF Invoice Add-on
In your Dashboard, head to MemberPress -> Add-ons and click to install the PDF Invoice add-on. Once it's installed, it will be automatically activated as well.
You will see new fields available in the “Info” tab of the MemberPress Settings page, below the PDF Invoice Settings section. You might need to expand those text boxes in order to see the whole content.

Step 2 – Set it up
Though the options are self-explanatory, here's a short description of what each does:
Template allows you to select between two different styles, Simple and Modern. Pick the one you like the most.
Phone & Email is where you should enter your company's telephone number and e-mail address.
Logo file picker allows you to select your company logo in a JPG, PNG or GIF image format, which will be shown at the top of your Invoice. Please make sure that the image is at least 400 pixels wide or it might end up blurry in the generated Invoice.
After that, you'll have three text editor boxes with the commands you might be familiar with from the Classic Editor, where you can set your Business Address, Customer's Address and Notes, where you can write anything you think should go after the actual table with the payment and price.
Finally, the Footnotes section allows you to put anything you want in the Invoice's footer.
You have a drop-down Shortcode Selector just below every one of those boxes, which you can use to easily select any available shortcode you want to show in any of these sections and insert it by clicking “Insert” button.
You can use Color picker to select the background color of the Invoice number.
Starting Invoice Number (Incremental Invoice ID's). You can use the option in the image below to set a starting number for your invoices. We recommend using a number larger than your most recent Transaction ID (integer) from the MemberPress > Transactions page. Existing Transactions, which existed before you set this number, will use their Transaction ID (integer) as the invoice ID.

And that's it.
Once you set up everything, don't forget to click the “Update Options” button at the bottom of that page!
If you'd want to customize it even further, you can override the PDF Invoice template just like any other, as explained in How to Override Template Files? tutorial.
Step 3 – Where to find it
Once the add-on is installed, activated and set up, your clients/members will be able to download invoices from their Account page by going to the Payments tab. The link to the invoice will be located in the Download column of the table that will be shown on that page.
The PDF's will also be attached and sent with the Transaction receipt emails.
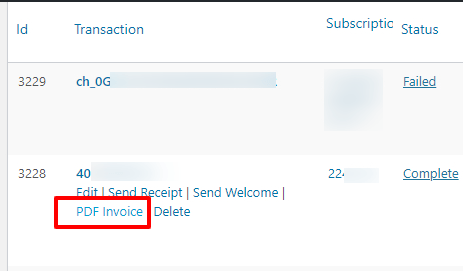
And lastly, you can download a PDF invoice for any of your Transactions from the MemberPress > Transactions page by clicking the “PDF Invoice” link under the transaction number like so:
I'm confused, help!
Shoot us an email from our support page if you need any further assistance with this integration.


