MemberPress has the default option for adding the “Terms of Service” consent to the membership registration forms. Providing a consent option is part of the industry standard for creating rules and regulations for visitors and members of your website. The “Require Terms of Service on membership registration forms” option can be found at Dashboard > MemberPress > Settings > Account tab. This is a global setting which means the terms of service apply to every registration form. You can find more details about this option here.
On the other hand, with MemberPress you can also create custom terms of service for each of your memberships. This is very useful if you have different rules applied for your members depending on the membership they are subscribed to.
You can make use of our custom fields feature to create a custom terms of service page for any page.
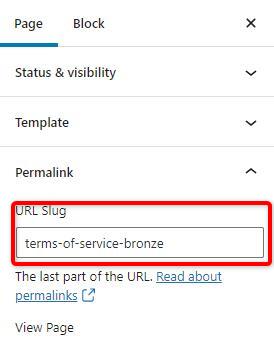
Step1: Create your Terms of Service page
Create your custom terms of service page and copy the Slug of the link of the page.
Step 2: Create a custom field
You can add the link to the custom TOS page using a custom field. To create a custom field you would need to go to your MemberPress settings => Fields tab and click the “plus button” under the “Custom User Information Fields” to add a new custom field. You would then enter the name of the custom field in the name field and specify which membership this is for. EG: Bronze Membership terms of service. This will help in creating a “unique slug’ for each “TOS”

Step 3: Add the link to your terms of service page
Edit the name field and remove the name of the membership. You then need to use the href tag below and add the slug from “Step 1” to create the link to the custom TOS page.
I agree to the <a href='/terms-of-service-bronze'>terms and conditions</a>

Step 3: Add the link to your terms of service page
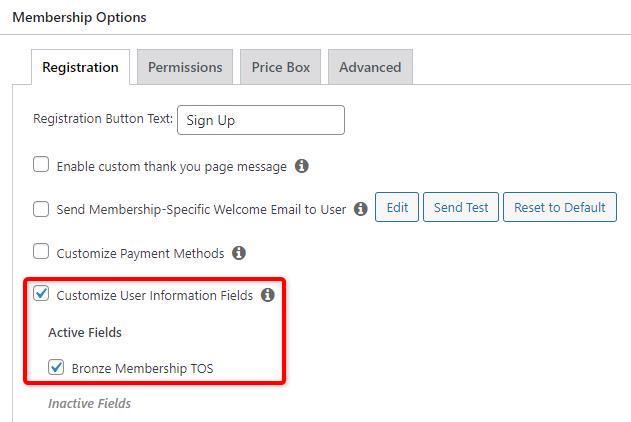
Once the custom field for your membership TOS has been created, you then need to go into the specific membership and enable the custom field. You will also want to make sure it is turned off for all other memberships. Once enabled, you will be able to view your custom field checkbox on your registration form.
Custom fields generally appear at the top of each registration form, which might not be the ideal place to place your TOS link. You can place your link at the bottom of the form, below the email and password fields. To do this, you would need to add the code below:
add_action('wp_head', function() { ?>
<script>
     (function($) {
          $(document).ready(function() {
               var passConf = $('.mepr_password_confirm');
               var tos = $('.mepr_mepr_bronze_membership_terms_of_service');
               if(passConf.length && tos.length) {
                    tos.insertAfter(passConf);
               }
          });
     })(jQuery);
</script>
<?php });
Replace the “mepr_mepr_bronze_membership_terms_of_service” in line 6 with the slug value you can see in the custom field you've created in Step 3. Keep in mind that even though your slug may look like this: “mepr_bronze_membership_terms_of_service” you should add another “mepr_” prefix, so the slug in the code should look like this: “mepr_mepr_bronze_membership_terms_of_service”. Once it's done, save your code.
Add the code below to your functions.php file or use the WPCode plugin (please check this article for details: How to add custom code snippets in WPCode).
That’s it, you have successfully added your custom terms of service to your registration form.


