A program is the central element of MemberPress CoachKit™, used to deliver your coaching track to your clients.
This document will show you how to create and manage coaching programs in CoachKit™.
Creating Programs in CoachKit™
Once your CoachKit™ plugin is activated and set, you can start creating your Coaching Programs. To add a program to your site, navigate to Dashboard > CoachKit™ > Programs and click Add New.

Here, you'll add cohorts, milestones, and habits, name the program, and click the Publish button to publish the program.
Adding Cohorts to a Coachkit™ Program
Cohorts are groups of clients enrolled in the program. You must create at least one cohort for each program.
Hence, to create a cohort, follow these steps:
- Begin editing your program, and click the New Cohort button on the right side of the screen. This opens a popup with available settings.

- Add a Cohort Name. This name will be publicly visible to your clients.
- Next, under the Coach dropdown, select the user who you wish to assign as the coach for this cohort. This can be an existing user, or you can add a new one.
- Further, under the Type option, you can choose one of the following options:
- Dynamic – with this type, clients can enroll at any time. For each client, the program will start on their enrollment date.
- Fixed – when Cohort is set to “Fixed”, you will see additional options to enter the Start Date and the End Date. Here, clients will be able to enroll anytime before the start date. But, though they enrolled on different dates, the program for all clients will start on the start date.

- To open a cohort for registration, under the Status dropdown, select Open.
- If you'd like to limit the size of your cohorts, you can enable the Limit no. of clients in Program option under the Enrollment cap section. Here, you can set the maximum number of clients for the cohort you’re creating.
- Also, you can enable appointment scheduling by clicking the Allow Client Appointments option. This will open an additional Appointment URL field where you can add the appointment scheduling page URL.
- Click the Save button to save the cohort.
Finally, you can add more cohorts by clicking the New Cohort button again and repeating the steps above.
Coachkit™ Program Milestones and Habits
Milestones and habits form the content of a program. Milestones are a collection of goals within one program, while habits are activities related to the same program.
When editing your program, you'll see the program content area with Milestones and Habits tabs.
Creating Milestones
To create milestones, click on the Milestones tab, and follow these steps:
- Click the “+ New Milestone” button to add your first milestone.

- Each milestone has its Goal Name. This is the milestone text that will be shown to your clients.
- Once you add the goal name, set a due date for this milestone (Goal Due). The due date is calculated beginning with the program's start date. The milestone will be due after the number of days, weeks, or months you specify.
- Optionally, you can enable the Check In option. This will trigger the Milestone Check-in Notice email. The email will be sent on the milestone due date unless it is completed before that date.
Enabling this option will display an additional Client Question field. The text you add to this field will serve as the title of the email triggered for this milestone.

- To create additional milestones, click on the “+” icon located below the milestones you've already added.
- Click the Publish / Update button to save your milestones.
Adding Courses Or Files to Milestones
You can add MemberPress courses or files to Coachkit™ programs.
Each milestone can have one course and multiple files assigned:
- Click on the Add New button, and select Course to add a course to the milestone.

- Also, when you click the Add New button, you can select Download to add a file to the milestone.
Creating Habits
Creating habits is similar to creating milestones:
- While editing a program, click on the Habits tab, and the +New Habit button to add your first habit.

- Add the Habit Name (text visible to clients).
- Select whether the habit should be repeated daily or weekly, and set the frequency in the Every _ day(s) / week(s) field (e.g. repeat daily, every 3 days).
- You can limit all habits to specific days of the week. Click on the days the habit should be added to the client's program (e.g. repeat daily, every 3 days, if the day is Monday or Friday).
- As with milestones, you can enable the Check In option. This will trigger the Habit Check-in Notice email. This email will be sent if a user does not complete the habit on time. Enabling this option displays an additional Client Question field to add a title to the triggered email.

- You can also add files to your habits by clicking the Add New button and selecting Download. As with milestones, this option is only available if the MemberPress Download add-on is activated on your site.
- Click the Publish / Update button to save all habits added to the Program.
Adding Files to Milestones and Habits
CoachKit™ comes with the MemberPress Downloads add-on integration, allowing you to add files to milestones and habits. To enable this feature, install and activate the MemberPress Downloads add-on on your site.
Once the add-on is installed, your CoachKit™ milestones and habits will show the Add New option. This option enables you to add any file uploaded with MemberPress downloads. You can upload any file type supported by the MemberPress Downloads add-on.
Follow these steps to add a file to your CoachKit™ milestone or habit:
- Navigate to Dashboard > MP Downloads > Files page > Add New, and upload the file you need.
- Next, navigate to the milestone or habit where you'd like to add the file. Click Add New, then Download to open a popup.

- In the popup, type in the file name to search for your file.
- Click on the file or files you need, and click the Add Downloads button.
Click Update to save changes to your program.
Once files are added to a milestone or habit, you'll see them listed on your site's backend. You can remove any file by clicking Delete next to the file you wish to remove.

On the front end, your users will now see a Downloads column, where they can download all files added to that milestone or habit.
In addition, the MemberPress Downloads add-on also allows you to protect your files, making them available exclusively to clients with an active subscription.
Enrolling Clients via Membership
To allow clients to enroll in a program, the program must be assigned to a membership. You can create a new membership for your programs or use one of your existing memberships.
For each membership, you can set up one or more programs. Within each program, you can tailor the available features to the subscribers of that specific membership. For example, you can decide whether members will have access to messaging within the program.
How To Assign Programs to Memberships?
To configure these settings, follow the steps below:
- Navigate to Dashboard > MemberPress > Memberships and locate the membership you want to add your program(s) to.
- Click Edit to open the membership editor;
- Scroll down to Membership Options and click on the CoachKit tab;
- In the dropdown menu, select the program you want to assign to this membership;
- Click on the second field, and select the features you want to enable for members subscribed to the membership;
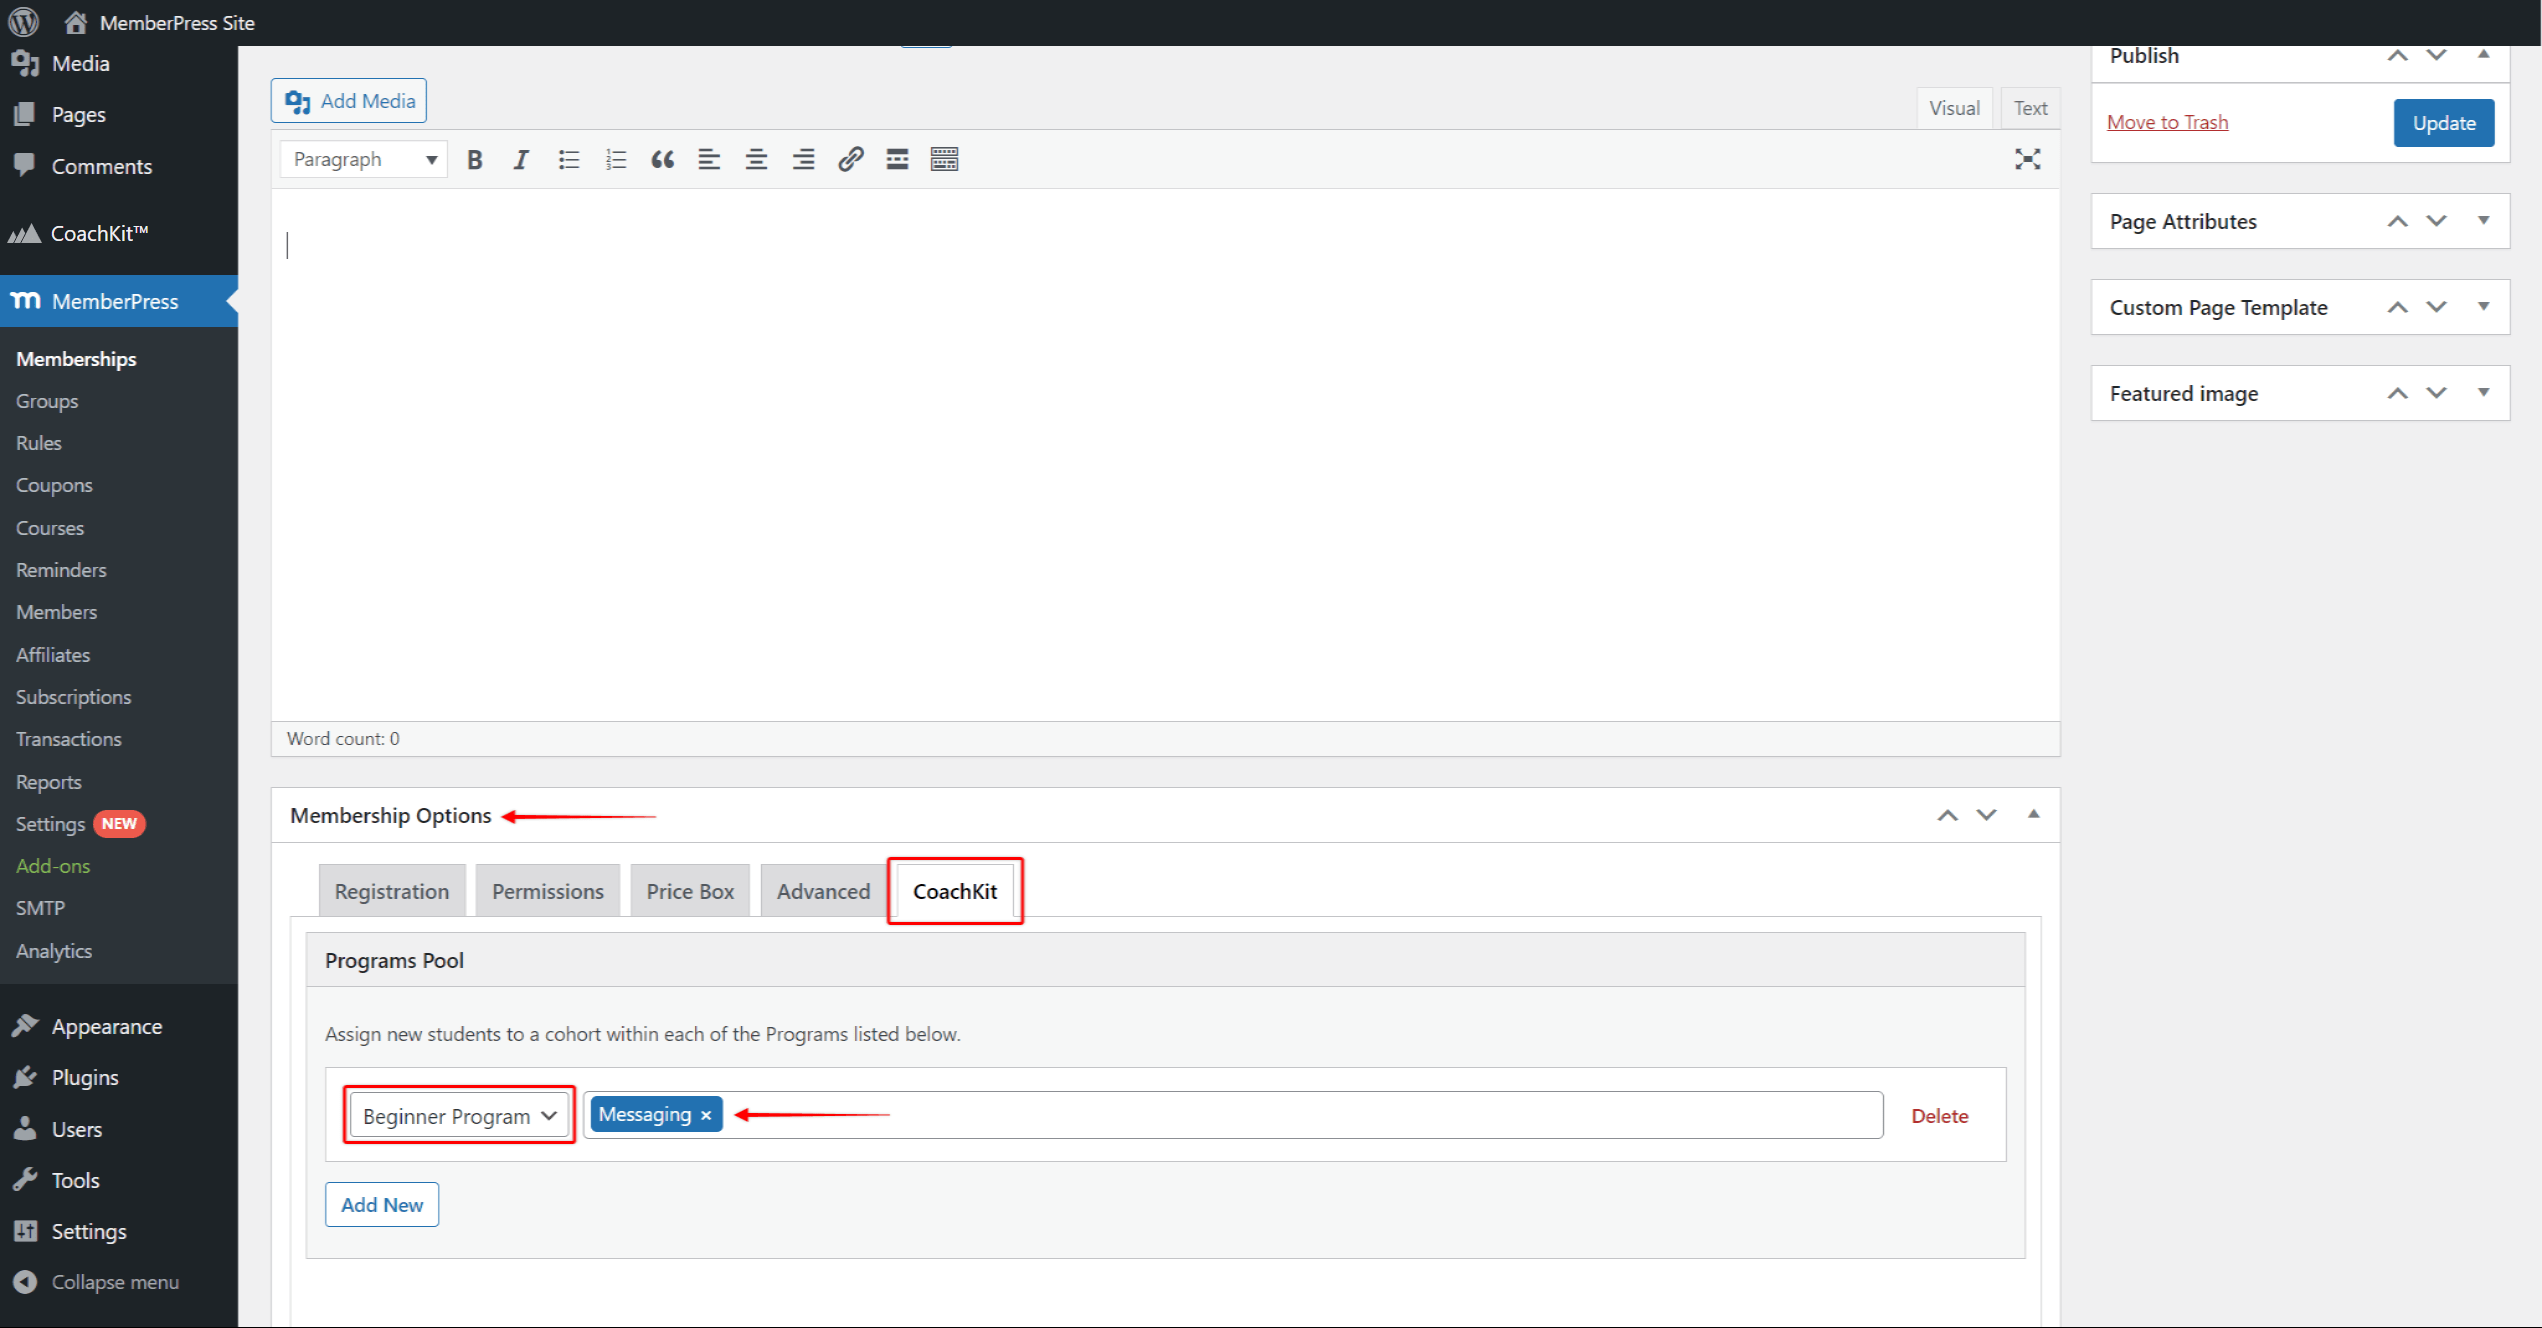
- If you want to assign more than one program to the membership, click the Add New button below, and repeat steps 3 and 4;
- After adding all programs, click the Update button to save changes.
Once you've taken the steps above, any user who subscribes to the membership in question will be automatically enrolled in all assigned programs.
When enrolling, clients are randomly assigned to one of the available cohorts within each program. CoachKit™ will fill cohorts with new clients beginning with the cohort with the most available seats.


