« Configuring the Marketing Tab
Install the Kit Add-on
To start, you’ll need to install and activate the Kit (formerly ConvertKit) add-on:
- Navigate to Dashboard > MemberPress > Add-ons.
- Browse add-ons or search for “Kit“ using the search tool.

- Once you find the add-on, click the Install Add-on button. This will automatically install and activate the add-on.
Enable the Kit Add-on
Once installed, you can enable the Kit integration and start setting it up:
- Navigate to Dashboard > MemberPress > Settings.
- Click the Marketing tab.

- Click the Enable Kit checkbox.
This will open the Kit integration options, allowing you to connect your Kit account to MemberPress.
Step 1 – Get Your Kit API Secret
Log in to your Kit.com account settings, navigate to Settings > Developer, and find your API Secret key.
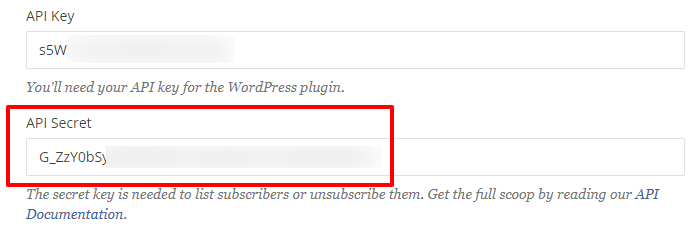
Step 2 – Add the Kit API Secret in MemberPress
Once you've obtained your API Secret, paste it into the Kit API Secret field shown below.

Step 3 – Select Your Kit Tag
Once MemberPress has established a connection, you'll see the green “All set!” text to the right of the field. Now you can select your Kit Global Tag from the drop-down option. Note that ALL members are added to this Global Tag (no matter what).

Set Up Per Membership Tags (Optional, but STRONGLY recommended)
Per-Membership Tags are a great way to segment your members by Tags for marketing purposes automatically. Setting these tags is optional, but it is recommended for better targeted marketing.
Once Kit is enabled, a new option becomes available under the “Advanced” tab for each Membership. This option allows you to select an Active Tag that is assigned only to members who purchase that Membership. A member will have this tag automatically added to or removed from their account depending on their current Subscription status for the Membership. The Inactive Tag is also automatically added/removed. The two tags will alternate based on the User's status on this Membership level.
The image below shows how to enable and set up your Per-Membership Active and Inactive Tags:

This concludes all the necessary steps needed for this integration.
Send Custom Fields to Kit
By default, MemberPress sends emails and the first name to Kit. It also updates global merge and per-membership tags. If you want to send a custom MemberPress field , you'll need to follow these steps:
- Head to WordPress Dashboard > MemberPress > Settings > Fields tab.
- Create a custom field and copy the slug of the custom field. In the example below, the slug is mepr_company_name.

Next, you should add the custom field to your Kit account:
- Log in to your Kit account and navigate to the Kit Subscribers page (Growth > Subscribers).
- Edit one of your subscribers in the Subscribers list.
- Here, click Add a new field and add the field with the same label as your MemberPress custom field.
- Click the Update Subscriber button.

Finally, return to your WordPress Dashboard and insert the code below at the end of your child theme's functions.php file. Alternatively, you can install the WPCode plugin and add custom code snippets in WPCode.
add_filter('mepr-convertkit-add-tag-args', function($args) {
  $fields = [];

  if(isset($_POST['mepr_company_name']) && !empty($_POST['mepr_company_name'])) {
    $fields['company_name'] = sanitize_text_field(wp_unslash($_POST['mepr_company_name']));
  }

  if(!empty($fields)) {
    $args['fields'] = (object) $fields;
  }

  return $args;
});
When users sign up for a membership, MemberPress will get the value entered into the custom field and send it to Kit. You'll see this value in the user profile in Kit.
That's it. You can duplicate the steps to send as many custom fields as you want to Kit! Just duplicate lines 2-3 in the code above, and replace tags, custom fields, and variable names.
To learn more about how to use Kit Automations with MemberPress, visit this page.
I'm confused. Help!
Shoot us an email from our support page if you need further assistance with this integration.


