Configuring and Troubleshooting with Stripe
Note: Stripe's terms of service require separate accounts for different businesses. If you are using MemberPress on multiple sites, but you only have one Stripe account, you must use Stripe Elements. Stripe Checkout does not support multiple sites.
Note: Stripe Checkout is not fully compatible with a multi-site setup in WordPress. If you are using multi-site, we recommend you use Stripe Elements.
Covered in this article:
- Video Setup Instructions
- Written Setup Instructions
- Detailed List of Gateway Settings
- Stripe Checkout vs Stripe Elements
- How to Enable Stripe Checkout
- How to Enable Stripe Elements
- Additional Payment Methods Available in Europe
- Additional Payment Methods Available in the USA
- Additional Payment Methods Available in the Other Countries
- Configuring for the EU's SCA
- How to Test with Stripe
- How to Process a Refund
- Canceling in Stripe
- Editing Stripe's Auto-Cancellation Trigger
- Stripe Tax
- How to Add a Missing Payment
- How to Change Your Stripe Account
- How to Change Stripe Statement Descriptor
- Note when Moving to a New Domain
- Note when Cloning to a Staging Site
- Gateway Issues
Video Setup Instructions
Written Setup Instructions
To connect Stripe to MemberPress, you will need to create the Stripe gateway in your MemberPress settings.
Detailed List of Gateway Settings
Below, you'll find explanations for all settings available for your Stripe Gateway. You can use this list as a reference during and after you've set up your gateway.
- Name - The name users will see when choosing this gateway option during registration.
- Gateway - This should be set to "Stripe" and will not show up on the front end.
- ID - ID of your gateway used in the database. MemberPress will assign this ID automatically. You can use this ID if you're importing subscriptions for this gateway as outlined here.
- Show Payment Label - When checked or unchecked, this will show or hide the Name you entered for this gateway option.
- Show Payment Icon - When checked or unchecked, this will show or hide the Stripe Credit Card symbols for this gateway option.
- Show Payment Description - When checked or unchecked, this will show or hide the description for this gateway option.
- Connect to Stripe - If your gateway is not set up, you will see the blue "Connect with Stripe" button to begin setting the gateway up. If you have connected your Stripe account, you will see a green message stating the connection has been successful with an option to disconnect it. Only disconnect your Stripe account here if advised to do so by our support team, or if following instructions from the "Gateway Issues" section below.
- Test Mode - Check this box if you would like to use Stripe in Test Mode for testing, or leave it unchecked if you are ready for live payments.
Note: Due to the way Stripe is configured, you will NOT be able to uncheck the "Test Mode" option if your site does not have the SSL set up. Please contact your host regarding how to get SSL on your site if needed.
Stripe Gateway Setup
As mentioned, you need to start by creating a new Stripe gateway in MemberPress settings. Please follow these steps:
- Navigate to Dashboard > MemberPress > Settings > Payments tab;
- Click on the "+ Add Payment Method" link to add a new gateway;
- Type in the name of this gateway into the "Name" field. This is the name that will be displayed for this Stripe gateway on your membership registration pages;
- Under the "Gateway" dropdown, select Stripe;
- Click on the "Update Options" button to save your gateway.
Now that the Stripe gateway is created, you can proceed to connect your Stripe account to MemberPress.
Connecting Stripe
MemberPress Stripe integration comes with an automated way of connecting your Stripe account with just a few easy steps:
- Find your Stripe gateway in the gateway list at Dashboard > MemberPress > Settings > Payments tab;
- Click on the Blue "Connect with Stripe" button to start the connection wizard;

- If you didn't previously connect your site to MemberPress.com, you will be asked to authenticate MemberPress here, using your MemberPress.com account username/password;

- Next, you'll be redirected to authenticate the connection with your Stripe account. If you're not already logged into the Stripe account, click the "Sign in" button at the top to log in:

- Select your Stripe Account and click the "Connect my Stripe account" button:

- After connecting, you'll be redirected back to MemberPress, and you'll see the following:

That's all! Now you're even more secure, and your secret and publishable keys and webhooks are no longer displayed and will be managed automatically for you.
Note: If your Stripe account has not been fully set up and enabled for Live mode, you will not be able to connect until you have verified your account.
Stripe Integration Capabilities
- Process One-Time Payments
- Process Recurring Payments
- Process Refunds
- Cancel Recurring Payments
- Change Credit Card for Recurring Subscription
- Pause Recurring Payments
- Resume Recurring Payments
- Process Free/Paid Trial Periods
- Credit Card Expiring Reminders Supported
Please have in mind that the maximum number of trial period days Stripe supports is 730 days (2 years).
Stripe LinkCopy link
Stripe Checkout vs Stripe Elements
Note: With Single Page Checkout enabled, the Stripe Element payment form does not appear on the checkout page until the required fields have been entered. If this user experience does not work for you, disable the Single Page Checkout (thus using the two-page checkout process). Or use Stripe Checkout instead.

How to Enable Stripe Checkout
To enable Stripe Checkout, navigate to your Dashboard > MemberPress > Settings > Payments, and click "Stripe Checkout" on your Stripe payment method:

You're all set! Now, members who sign up with Stripe will be taken to Stripe to process their payments.
You can now enable Apple Pay and/or Google Pay if you want to offer it as a payment option to your members. Both Apple Pay and Google Pay should be enabled by default, but you can selectively disable or enable them if you want to only enable Apple Pay or vice-versa.
You'll want to sign in to your Stripe Dashboard and go to Settings > Payments > Checkout Settings to find the appropriate options:

Apple Pay and Google Pay should be available to members on your site when they check out with Stripe Checkout.
NOTE: If a user wants to use Apple Pay, then they'll need to meet the following criteria:
- Apple Pay is enabled for Checkout in your Stripe Dashboard.
- The customer's device is running macOS 10.14.1+ or iOS 12.1+.
- The customer is using the Safari browser.
- The customer has a valid card registered with Apple Pay.
NOTE: If a user wants to use Google Pay, then they'll need to meet the following criteria:
- Google Pay is enabled for Checkout in your Stripe Dashboard.
- The customer is using Google Chrome or Safari.
- The customer has a valid card registered with Google Pay.
How to Enable Stripe Elements
The only difference between setting up Stripe Checkout and Stripe Elements is the checkbox above. If you'd like to use Elements, simply check the Stripe Elements box instead of the Stripe Checkout box.
How to Enable Apple Pay/Google Pay with Stripe Elements
Using the Stripe Elements integration, members can pay for their memberships on your actual website rather than a pre-hosted checkout page housed on Stripe.com. This ensures that your site's branding (colors, logos, layout, etc.) will remain the same even when members check out as they're staying on your site.
Apple Pay
When Stripe Elements is enabled you will see "Customize Payment Methods" button. Click this button, select Apple Pay in the popup window, and hit "Update" button to enable Apple Pay on your site.

That's it! You can now start taking payments through Apple Pay with Stripe Elements.
If you have trouble and don't see Apple Pay, you will need to manually enable Apple Pay by following these steps:
1. From the Apple Pay settings page, click + Add new domain.

2. Enter the top-level domain or sub-domain where you're using MemberPress (e.g. yourwebsite.com or shop.yourwebsite.com).
3. Download the verification file: this will be a text file titled apple-developer-merchantid-domain-association. If you use the WooCommerce Stripe plugin, you can skip this step.
4. Upload the verification file to your website's .well-known folder inside the root folder of your WordPress installation. If this folder is not already there, you can just create it. The resulting URL should look like https://yourwebsite.com/.well-known/apple-developer-merchantid-domain-association.
5. Click the Add button, and Stripe will attempt to verify the merchantid file by visiting that URL.
NOTE: If a user wants to use Apple Pay, then they'll need to meet the following criteria:
- The customer's device is running macOS 10.14.1+ or iOS 12.1+.
- The customer is using the Safari browser.
- The customer has a valid card registered with Apple Pay.
Google Pay
When Stripe Elements is enabled you will see "Customize Payment Methods" button. Click this button, select Google Pay in the popup window, and hit "Update" button to enable Google Pay on your site.
NOTE: If a user wants to use Google Pay, then they'll need to meet the following criteria:
- The customer is using Google Chrome or Safari.
- The customer has a valid card registered with Google Pay.
Additional Payment Methods
The MemberPress integration with Stripe supports 24 additional payment methods. The availability of these payment methods will vary depending on the currency selected in your MemberPress settings.
To enable these payment methods, please check the "How To Enable Payment Methods With Stripe and Memberpress" document.
Video tutorial on enabling additional payment methods in Stripe
Additional Payment Methods Available in Europe
If your currency is set to EUR at Dashboard > MemberPress > Settings > General tab, you will be able to use additional payment methods with Stripe:
- SEPA Direct Debit
- iDEAL
- Bancontact
- Giropay
- Klarna
- Sofort
- Przelewy24 (P24)
- EPS
- Afterpay and Clearpay
- Alipay
- WeChat Pay
Additionally, some of the payment methods will be available if your MemberPress payments are using some other European currencies:
- Przelewy24 (P24): PLN
- BLIK: PLN
- Klarna: CHF, CZK, DKK, GBP, NOK, PLN, SEK
- Afterpay and Clearpay: GBP
- Alipay: GBP
- WeChat Pay: GBP, DKK, NOK, SEK, CHF
- BACS Direct Debit: GBP
Note: iDeal, Bancontact, Giropay, Sofort, and Przelewy24 methods will only work with non-recurring memberships and will not be visible on the Stripe Checkout page for recurring memberships.
You can remove this code snippet from your site and enable/disable payment methods using the "Customize Payment Methods" button on your Stripe gateway settings at Dashboard > MemberPress > Settings > Payments tab.add_filter('mepr-stripe-checkout-methods-for-onetime-payment', function($methods) { return array( 'card', // Default card 'sepa_debit', // SEPA Debit 'ideal', // iDEAL 'bancontact', // Bancontact 'giropay', // Giropay 'sofort', // Sofort 'p24' // Przelewy24 ); });
Additional Payment Methods Available in the USA
If your currency is set to USD at Dashboard > MemberPress > Settings > General tab, you will be able to use additional payment methods with Stripe:
Additional Payment Methods Available in the Other Countries
If your website is set to other national currencies, the available payment options would be different from country to country. Please find the available options for your country in the list below (A-Z):
- Australia: BECS Direct Debit, Afterpay and Clearpay, Klarna, Alipay, WeChat Pay
- Brazil: Boleto
- Canada: Afterpay and Clearpay, Klarna, Alipay, WeChat Pay
- China: Alipay, WeChat Pay
- Japan: Konbini, Alipay, WeChat Pay
- Malaysia: FPX, Alipay, GrabPay
- Mexico: OXXO
- New Zealand: Afterpay and Clearpay, Klarna, Alipay
- Singapore: PayNow, Alipay, GrabPay, WeChat Pay
- Thailand: PromptPay
Note: If your country is not mentioned in the list above, or in the section about payment methods in Europe, this means that no additional payment methods are available in your country with Stripe integration.
Configuring for the EU's SCA
As of Sept 14, 2019, the EU is enforcing Strong Customer Authentication (SCA). Stripe is handling this SCA with 3D Secure (3DS).
MemberPress 1.6.0+ now fully supports SCA via Stripe's new SCA enabled APIs. Be sure you keep your MemberPress plugin up to date to keep up with the latest changes and improvements.
At this time, there's nothing special you need to do to get this feature working, aside from enabling the emails mentioned below.
When a member is registering, and 3DS is enforced, a pop-up will appear where they can complete their 3DS authentication. If successful, the subscription and subsequent payments should proceed without requiring further authentication. If unsuccessful, the customer will see an authentication failed error and be asked to try again.
Subscriptions created before SCA enforcement should not be subject to 3DS; however, we do anticipate that in the future, some renewals could end up being held for 3DS authentication by the customer's bank.
When a payment is held for authentication, Stripe can automatically email the customer with a link to (re)authenticate. But you must enable the email options in your Stripe.com dashboard settings.
Stripe.com > Dashboard > Settings > Stripe apps > Billing > Subscriptions and emails > Manage payments that require 3D Secure.
Your settings should look like this:

How to Test with Stripe
First, you will need to set your gateway to test mode by simply checking the Test Mode box after connecting Stripe, as outlined in the video above, between minutes 1:30 and 3:40. When going through the registration process as a new user, you will need to present test card credentials. Here you can find the list of approved Stripe Test Card credentials. For additional info on testing in MemberPress, please see this page.
Video tutorial on testing Stripe with MemberPress:
How to Process a Refund
Though you should generally be able to follow our instructions to refund users who signed up via Stripe, you can also follow these detailed instructions provided by Stripe support to cancel directly in Stripe if needed.
Canceling in Stripe
Usually, you will want to cancel subscriptions directly in MemberPress, as outlined here. However, you may need to cancel a subscription directly in your Stripe Dashboard. This would mainly be needed if you deleted the subscription in MemberPress before correctly canceling it. If this or anything else is the case, you can follow these detailed instructions to cancel directly in your Stripe Dashboard:
- Login to your Stripe Dashboard here.
- In the top search bar, search for the user based on the user's email (best) or username.
- Click on the correct customer based on your search.
- Scroll down to the 'Active subscriptions' section.
- Click on the "..." icon.
- Click "Cancel subscription".
- In the pop-up, select "Immediately" as the option.
- Click the "End subscription" button.
- Verify that it now says "No active subscriptions" in the "Active subscriptions" section.
Editing Stripe's Auto-Cancellation Trigger
After X amount of failed attempts to bill a recurring subscription, Stripe will automatically cancel the subscription. Within your Stripe Dashboard, you can control how many attempts Stripe will make before automatically canceling the subscription. This is done from within your Stripe Dashboard > Settings > Stripe Apps > Billing Settings > Retry Rules, as shown here:

You are welcome to set this to be whatever you would like, but just note that if you are using something like Churn Buster; you should have it set to auto-cancel after the last failed attempt (as is set with the "cancel the subscription" option from the dropdown as shown above - the same setting is available for Custom dunning rules as well).
Stripe Tax
Stripe Tax is a feature provided by Stripe that allows automated tax calculations on your site. The Stripe Tax built-in integration is available with all MemberPress plans, thus it will be available out-of-the-box with your MemberPress plugin.
Once you connect your Stripe account to MemberPress, you can choose to start using Stripe to calculate your tax rates on membership registrations. To do this, simply enable Stripe Tax and choose the Stripe payment gateway you wish to use.
Stripe Tax is only available after you enable and configure taxes in your MemberPress settings.
How to Add a Missing Payment
These instructions are to be followed when in Stripe you see a completed payment, but that payment is not reflected on the MemberPress > Transactions page and/or is not connected to its subscription on the MemberPress > Subscriptions page.
Note: Please note that a missing payment is a sign that there is an issue with your Stripe webhook or (though less likely) it is being blocked by a server/host security feature or impacted by aggressive caching. Please follow our instructions in the Gateway Issues section below (first point) to fix this.
Step 1 - Find the Transaction ID for the Payment in Stripe
To begin with, you will need some information in order to find the payment if you are not already aware of it. Things you can use to search for it include:
- The subscription ID (if a recurring subscription) as it appears on the MemberPress > Subscriptions page (looks like sub_xxxxx or if on an older version of MemberPress, it might look like cus_xxxxx).
Note: If the Subscription ID at MemberPress > Subscriptions page for the user in question doesn't have the proper Stripe format (sub_xxxxx or cus_xxxxx) and instead has the mp-sub-xxxxx format, you need to edit the subscription first and apply the proper subscription ID.
- Login to your Stripe Dashboard. You can use this link
- Using the top search bar, enter the information gained above (e.g. the user’s email, subscription ID, etc.). The suggested option would be to search using the user’s email address;

- When searching using the user’s email address, payments will be listed under Payment Intents. Look for the payment you need using the information you already have about this user’s missing payment (date of purchase, amount, etc.);
- Once you find the missing payment, click on that payment in the list. This will transfer you to the Payment Details page;
- Scroll down to the “Connections” section;

- Copy the Latest charge ID you see there. This will be used in Step 2 below.
Note: If you used the subscription ID for your search (instead of email), you will see the payments listed under the Invoices. In this case, clicking on the payment in the search results will take you to the Invoice page of that payment. To navigate to the Payment Details page, please follow the steps:
- Scroll down to the Payments section to find the payment you need;
- On the right side of the payment, you will see a 3-dot icon. Click on it;
- Select the "View payment details" option.
Step 2 - Manually add the Transaction
To manually add the missing payment, you can follow these steps based on the type of payment you received:
A Single One-Time Payment (NOT associated with an existing recurring subscription):
- Go to MemberPress -> Transactions.
- Select Add new at the top of the page.
- Paste in Transaction ID you identified above in Step 1 into the Transaction number.
- Select the user you would like the transaction to be associated with. You can start typing in the username, and available options will pop up.
- Select which Membership the transaction should be associated with.
- Add the transaction Sub-Total amount. This should be what the user paid you.
- Add in any data related to taxes as applicable.
- Set the Status of the transaction to Complete.
- Set the Gateway to Stripe.
- Leave the Subscription field blank.
- Add the Created Date. The date you set here will be the date at which the user paid you.
- Add the Expiration Date. The date you set here will be the date at which the user's payment is set to expire.
- Select Create.
If you want to add a transaction to an existing recurring subscription:
- Go to MemberPress -> Subscriptions.
- Search for the user's subscription you would like to add the missing payment to.
- Hover over the subscription's unique ID and click on the "Add Txn" link.
- Paste in the Transaction ID you identified above in Step 1 into the Transaction number.
- Select the user you would like the transaction to be associated with. You can start typing in the username, and available options will pop up.
- Select which Membership the transaction should be associated with.
- Add the transaction Sub-Total amount. This should be what the user paid you.
- Add in any data related to taxes as applicable.
- Set the Status of the transaction to Complete.
- Set the Gateway to Stripe.
- Leave the Subscription field as is (it should have been auto-populated with the correct ID).
- Add the Created Date. The date you set here will be the date at which the user paid you.
- Add the Expiration Date. The date you set here will be the date at which the user's payment is set to expire.
- Select Create.
Step 3 - Verify
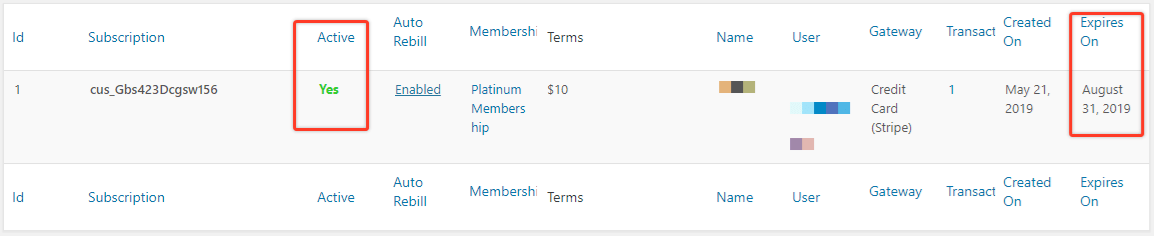
After completing these steps, the payment should be correctly added, and the user's subscription should be marked as active, as highlighted here ( Note: on the MemberPress > Subscription page, the Active column should be set to a green Yes, and the Expires on column should reflect the missing payment's expiration date.):
How to Change Your Stripe Account
NOTE: Do NOT delete your Stripe gateway and recreate it!
If you need to update your Stripe account that is currently being used for taking payments on your site, please follow these steps:
- On the MemberPress > Settings > Payments tab, edit your current Stripe gateway to differentiate it from your old one.
- On the MemberPress > Settings > Payments tab, use the (+) option to create your new Stripe gateway. Follow the instructions above to set it up.
- For each and every membership on your site (and all memberships created in the future), follow these steps:
- On the MemberPress > Memberships > Click on the Membership Name > Membership Options > Registration tab > click on the Customize Payment Methods setting.
- Select all the payment gateways you want users to be able to purchase through.
- Leave the old Stripe gateway option unchecked so that it appears in the Inactive Payment Methods section of that setting.
- Click the Update button to save the membership settings.
- Repeat for every membership on your site and all future memberships.
How to Change Stripe Statement Descriptor
MemberPress creates a Stripe Product the first time membership is purchased, with a generated statement descriptor.
It first tries to take the "Site Title" from the WordPress General Settings page; if that is empty, it will use the domain name from the "WordPress Address (URL)" option on the same page.
Once the Product is created, the statement descriptor can only be changed within Stripe. MemberPress will generate the same statement descriptor for each membership the first time it's purchased. So if you're adding new memberships often and want to control the statement descriptor when these products are created, you can use this custom code, for example, https://gist.github.com/allycspf/7b5f562a2f706e44a63177c6803f14a3.
Otherwise, you can edit the statement descriptor in the settings for the Product within the Stripe Dashboard. First, go to Products, click into the product, click Edit at the Details section, and expand the Advanced options section where you can change the statement descriptor or set it to empty to use the account statement descriptor.
When using Stripe Elements, MemberPress doesn't create a Stripe Product or set a statement descriptor for one-time payments (non-recurring memberships). For these payments, Stripe would use the statement descriptor at Stripe Dashboard - Settings - Account Settings - Statement Descriptor. When using Stripe Checkout it will create a Stripe Product, so the statement descriptor could be edited in the product settings to have a membership-specific statement descriptor.
Note when Moving to a New Domain
If you are going to be moving to a new domain (i.e. www.olddomain.com to www.newdomain.com), then please, follow these instructions after the domain update:
- On the WordPress Dashboard -> MemberPress plugin -> Settings page -> License tab, be sure you are using at least version 1.8.7 or newer of MemberPress and that your license key is active. The version is shown right above the Update button.
- Disconnect your Stripe payment gateway in the MemberPress plugin > Settings page > Payments tab (do NOT delete it, just disconnect)
- Add
/wp-admin/?mp-clear-connection-data=trueto the end of your site URL, so it looks something like:https://www.yoursite.com/wp-admin/?mp-clear-connection-data=true - Click Enter on your keyboard to visit that URL. This will clear out your Stripe connection for the old domain.
- Now reconnect your Stripe gateway. This will update your webhooks to use the new domain.
Note when Cloning to a Staging Site
IMPORTANT: Cloning a live site without following the steps here: How to create a Staging site with MemberPress could have a negative impact on your Stripe Renewal payments.
If you clone the live site without performing these steps below, it could have a negative impact on your Stripe renewal payments. To avoid any potential issues, after you have cloned it to your staging site, be sure to follow the steps outlined in our How to create a Staging site with MemberPress article.
IMPORTANT: Disconnecting Stripe, deleting the Stripe payment method, or disconnecting from MemberPress.com on a staging site (cloned from live) will delete the live webhook!
Gateway Issues
If you have followed exactly the instructions on this page for setting up your gateway, then it should work properly. So, if you are noticing issues with your gateway, it will likely be related to one of the items listed below. We have also included what to do if you see these issues.
- Subscriptions and/or Transactions aren't updating correctly - If you are seeing subscriptions connecting to MemberPress with an ID that looks like mp-sub-xxxxxxxxxx and transactions that have ID's that look like mp-txn-xxxxxxxxxx, then the issue is related to your Webhook URL. You may be able to resolve this issue by navigating to your MemberPress > Settings > Payments tab > and using the "Disconnect" button to break the connection, then reconnecting using the setup instructions above for a soft reset. Please do this at a low traffic time for your site, as any signup attempts made while disconnected will result in a failed signup.
If you're sure that you've set everything right, but payments are still not getting through. This could be IP blocking issue.
If you have Wordfence, iTheme Security, some other software firewall or your hosting filters IPs, please make sure that these IPs are allowed (taken from https://stripe.com/docs/ips#webhook-notifications page):
3.18.12.63
3.130.192.231
13.235.14.237
13.235.122.149
18.211.135.69
35.154.171.200
52.15.183.38
54.88.130.119
54.88.130.237
54.187.174.169
54.187.205.235
54.187.216.72
If this does not work, please contact us. - You or the user aren't receiving the MemberPress Welcome email, New user sign up email, or other MemberPress emails - These new user MemberPress emails are triggered during the registration process by a completed transaction. If the transaction isn't completing in MemberPress but is marked as such in Stripe, then this is related to the Webhook URL. Please follow the same instructions in the above point to fix.
- You received an email from Stripe with this subject or similar: Problem with your Stripe webhook (https://yoursite.com/mepr/notify/df5436-452/whk) - This email could be triggered by one of the following two items: (1) TLS/SSL certificate issues. Stripe refuses to send the webhook because it doesn't like the SSL setup on the site. To resolve this, you will need to contact whoever you purchased your SSL/TLS certificate through to make sure your certificate is up to date with the current standards that Stripe is looking for. (2) 403 error caused by an anti-spam or security plugin. To resolve, you will need to find the plugin causing the issue by deactivating any plugin fitting that criteria. If the issue goes away after deactivating the plugin, then you will know that it is the plugin that was causing the issue.
- You get the "Sorry, updating your credentials failed. (pmt)" error when you try to complete the Stripe Connect procedure - This most likely means that cURL is either not installed, not functional or not up-to-date on your hosting server. Please go to your WordPress Dashboard -> Tools -> Site Health and check the Status tab for any mention of cURL issues. It could look like this:
 Please note that you'll get the same error message if your WordPress installation is not at version 4.6 or newer.
 - Your users see this error before getting to the payment screen: ERROR Invalid Payment Method. - This likely means that you have enabled the Customize Payment Methods setting (Which is found in the Membership Options (when editing your membership) > Registration tab.) and left this gateway option unchecked. To fix this, simply uncheck the Customize Payment Methods option altogether, or if you need it to disable other gateway options for your membership, be sure to check this gateway option.
- The checkout page loads, but data cannot be entered into the form. - This will occur if you are not complying with Stripe's security requirements (having a valid SSL certificate for both live and sandbox payments is mandatory) OR if you are using a javascript minimizer or optimizer. Please contact Stripe support to verify that your SSL/TLS certificate is compliant with their requirements.
- After you add MemberPress' webhook, your Woocommerce webhook starts having delivery issues and could even get disabled by Stripe. If this happens, you should try removing any value from the "Webhook Secret" at WooCommerce -> Settings -> Payments -> Stripe - https://share.cspf.co/o0umzl1q. Then enable the Woocommerce webhook again in Stripe and monitor for errors.
- Using Stripe Checkout does not redirect to Stripe, instead just displays the thank you page: If you have translated or changed any strings on your site, make sure that the string "Stripe" wasn't translated. Translating this string will break the Stripe checkout code. This is an issue we are aware of and are working to correct. For now, set the string back to "Stripe" to get Stripe Checkout working again.
- Stipe Payment Fields do not appear on checkout page: If you are using Single Page Checkout and Stripe Elements, users must enter their email address and other required fields before the fields display. Disabled Single Page Checkout or switch to Stripe Checkout. See also: Why don't the payment fields appear on the checkout page?
- There are a lot of incomplete payments in your Stripe Dashboard: If you are using Single Page Checkout and Stripe Elements, this is caused by logged in users visiting or refreshing the checkout page. Disabled Single Page Checkout or switch to Stripe Checkout. See also: Why are there so many incomplete payments in Stripe?
- Payments never completed: Check if you are having basic authentication configured in .htaccess file to prevent search engines read your sites. If yes, make sure to delete it.
 Please note that you'll get the same error message if your WordPress installation is not at version 4.6 or newer.
Help?
Are you still having issues with your Stripe gateway even after reviewing the solutions outlined in the Gateway Issues section above? No problem, just send us a support ticket with a brief description of your issue and what you've found in your tests so far. Please be sure to follow the instructions in the Gateway Issues section to the best of your ability first, as we'll need to review your results first in the support process.