Configuring the Fields tab

Video Overview
Basic Settings
You can toggle whether to require first name, last name, and address fields when signing up, as well as during a logged-in purchase under the Logged In Purchases and the Extended User Information Fields sections.

Creating Custom Fields
A great feature of MemberPress is the ability to create unlimited custom fields for your members to fill out. These fields can be shown during signup, or just on the account page after signup – i.e; you want to get their birthday or find out how they heard about your site.
Further, in each Memberships's settings, you can choose to show or hide certain fields. This will allow you to show only the fields you want showing on each Membership's signup form. MemberPress will then intelligently show the member-only fields that belong to the Membership(s) they have registered for on their account page.

Creating a Default Blank Option for Drop Down Custom Field
NOTE: Our drop-down menu custom field doesn't currently have a default "empty" option. If you fail to add one yourself, then users will be able to submit your registration form without having selected an entry if it is a required field. To add an "empty" option, simply add the following as your first option:

That way, when your users fail to select an option, MemberPress won't let them submit the form and it will show this error:

Creating a Clickable Checkbox Option
To create a clickable checkbox custom field, you can simply add some basic html to the field name when creating it. Here is an example:
<a href='https://www.yoursite.com/special-policies' target='_blank'>Please agree to our Special Policies</a>
NOTE: you must use single quotes as in the example above. Double quote marks will not work.

Which will show up on the registration page like this:

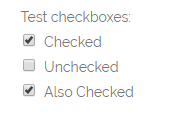
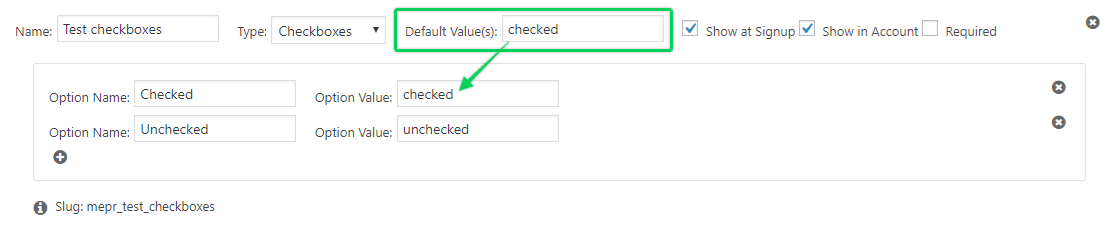
Enabling Multiple "Checked" Options for Multi-Select and Checkboxes Custom Fields
MemberPress allows you to enter a default option to be selected or checked for Multi-Select and Checkboxes Custom Field types using the Default Value(s) option for the field and entering the option value as shown here:
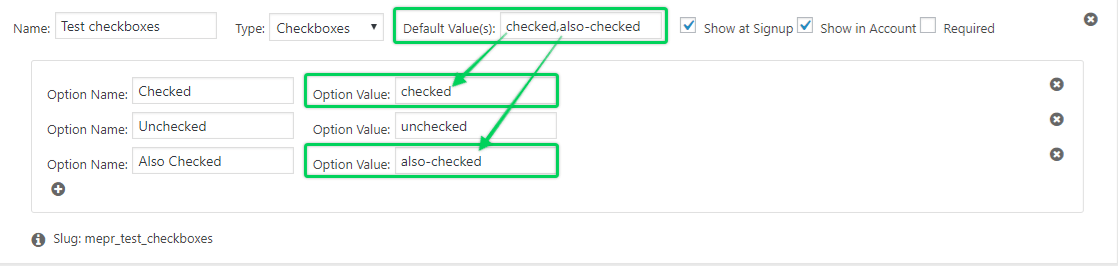
To have more than one option checked, simply separate the Option Values entered in the Default Value(s) option as shown here (comma-separated, with no spaces between entries):
Here is what this would look like on your registration page: