MemberPress Downloads Add-on
Covered in this article:
Overview
If you're using a caching plugin or other caching service, you'll need to add /mpdl to the exclusions list.
What Does Downloads Do For Me?
Video Tutorial
Installing
- Make sure your license key is activated on the MemberPress > Settings > License tab.
After activating the license key, visit the MemberPress menu > Add-ons page, and click the "Install Add-on" button under the MemberPress Downloads icon.

That's it, now you'll have a new "MP Downloads" menu item in your Dashboard.


Uploading Files
To upload your files, head to MP Downloads > Files page > Add New.
For this example we'll upload a PDF file for members only.
Enter a title for the file. Use something unique that will help you identify this file later.

Drag and drop the file into the large space, or choose "Select File" to select the file from your device's hard drive.

Note: Bulk uploading files is not supported within the MemberPress Downloads Add-on. You can only upload one file at a time.
- That's it! Now you can publish your file.
- After publishing, your files will be listed on the MP Downloads > Files page like so:
- Now you can easily copy the shortcode and place it in your site's content. Note: If you need to replace an existing file you uploaded through the MemberPress Downloads Add-on, make sure the file name also matches the file name shown in the permalink.


File Details
When viewing the details of an existing file, you'll see the name, slug URL (which can be shared publicly), a preview of the file (if it is an image), and the number of total downloads.
You may also choose to organize your uploads by using the "File Categories" or "File Tags". These are different from the categories and tags you may have set up in WP for posts and pages. For more information see the File Categories and File Tags section below.
Once you publish the uploaded file, it is now accessible from the slug URL. You can use that URL to share the item with your members directly, or you can place one of our shortcodes somewhere in your membership's content pages. See the shortcode section for more help.
File Categories and File Tags
With MemberPress Downloads you can categorize or tag your files with its "File Categories" and "File Tags" features. These work just like the standard WordPress categories and tags for Posts.
Categorizing and tagging files is a great way keep your files organized! But it has a few other benefits.
The greatest benefit is the ability to protect a large group of files with a single MemberPress Rule (see the Protecting Files section below for more info).
There are two ways to categorize or tag your Files.
1 - The first is to edit your file and set a File Category and/or Tag, and save the file like so:

2 - The second way to categorize or tag your files is to use the Quick Edit when viewing the list of files like so:

Now that your files are uploaded and categorized/tagged, you're ready to protect the files using MemberPress Rules.
Protecting Files
You can protect your files using MemberPress Rules, just like any other kind of content you protect. You can protect individual files, files with a certain category, or files with a certain tag.
In this example, we'll protect any files that are tagged as "members-only".
- First, go to the MemberPress menu > Rules > Add New page.
Select the "Files with File Tag" option from the dropdown and type in the tag you want to protect ("members-only" for example).

- Set your Access Conditions on the Rule and save.
- That's it! Now any files with the "members-only" tag will be protected from unauthorized users automatically.

Download Limits
The MemberPress Downloads Add-on offers a convenient way for you to limit the number of downloads on a per-file or per-user basis. You can turn on download limits by enabling the "Enable Download Limit" option when editing a file. Enabling this option will expand an area with three other options:

The first option is for download limits on the file itself. For example, if you'd like the file to only be downloaded five times before it can no longer be downloaded, then you'll just want to set this option to "5".
The second option is for download limits for each user. For example, if you only want the file to be downloaded by a user three times before they can no longer download it, you'll want to set this option to "3".
Note: Whenever user limits are active, logged-out users/guests will not be able to download the file.
The option for either "Download Limit" or "User Limit" can be left at 0 if you don't want that particular limit to affect the file.
The last option is for the redirect URL. If the user isn't able to download the file due to its limits, they'll be redirected to the URL set in this option. If the Redirect URL option is left empty, users will be taken to the Unauthorized Redirect URL (if unauthorized redirects are enabled in MemberPress), or they'll be taken to the MemberPress Account page.
Shortcodes
The MemberPress Downloads add-on comes with a few shortcodes you can use to display download links to your files. You can copy a shortcode to any file using the link "Copy shortcode" under the file name in the files list view.
The following shortcodes are available:
- mpdl-file-link
- mpdl-file-links
Note for advanced users: All the shortcodes mentioned below support a class="xyz" parameter which can be used to add a CSS class to the anchor tag for the file links. You can use this parameter to add CSS classes to your download links to restyle them as buttons, for example.
Single File
The following shortcode will output a link that users can click to download the file.
[mpdl-file-link file_id="xxx"]
Replace "xxx" with the file ID. If you're not sure what the ID is, you can find it in the URL when editing a file like so:

List of Files by Tag
The following shortcode will generate a list of downloadable links with the same tag.
[mpdl-file-links tag="members-only"]
Replace "members-only" with the slug of the tag you wish to display.
This shortcode also allows you to add multiple tags separated by a comma like so:
[mpdl-file-links tag="members-only,authors"]
By default, it will display all links to files having one of the tags. However, if you want the links to files with all tags listed in tag attribute to show up, you can use the special attribute: tag-relation like so:
[mpdl-file-links tag="members-only,authors" tag-relation="and"]
List of Files by Category
The following shortcode will create a list of downloadable links having the same category.
[mpdl-file-links category="pdfs"]
[mpdl-file-links category="pdfs,imgs"]
It will display all links to files having one of the categories. However, if you want the links to files with all categories listed in category attribute to show up, you can use category-relation attribute like so:
[mpdl-file-links category="pdfs,imgs" category-relation="and"]
Sort Files
The links can be sorted by date (default), title, date, name, and ID in descending (default) and ascending order. The following shortcode will create a list sorted by title in ascending order:
[mpdl-file-links orderby="title" order="asc"]
Show Description
Each file in MP Downloads has a Description field where you can add a file description. To display descriptions next to the file link you will need to add the show_description attribute and set it to true:
[mpdl-file-links show_description="true"]
It will work for single file the same way:
[mpdl-file-link show_description="true"]
Gutenberg Block
Instead of using shortcodes, you can use Gutenberg Download block to display a single file link or a list of file links. If you want to learn more about Gutenberg Blocks please check out this documentation:
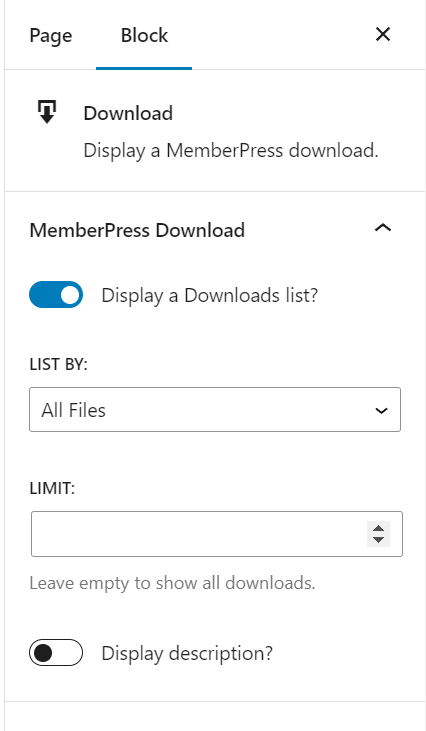
The available options for the Download block are:
- Display a Downloads list: when is checked the list of file links will be displayed and you can filter list with options below. When you disable this option you will see Select a Download dropdown list where you can select the file link you want to display
- List By: by default all file links will be displayed. You can also display all files with specific category or tag by selecting Category or Tag options
- Limit: the number of file links to display
- Display description: decide if you want to display file description next to file link
Stats
You can use the stats section to see which members downloaded your files. Filter by file and/or by date for more specific info.
You can also search for a particular user by username or email address to see what files that user has downloaded.
Force View Option for PDFs and Images
You can enable this option for each uploaded PDF or image. This option makes it so the user can view the file directly in the window instead of immediately downloading the file. Here's where you enable it:

Note: This option is only available to use with PDFs and image files.