Installation & Configuration of our Mailchimp Addon
« Configuring the Marketing Tab
This add-on is included with your purchase of the Basic, Plus, or Pro edition of MemberPress.
Video Instructions:
Part 1: MailChimp Add-on Setup + Creating a Global Merge Tag
Part 2: Creating Per-Membership Merge Tags
Part 3: Creating Segments and Email Campaigns
Written Step-by-Step Instructions (Mailchimp 3.0)
Step 1 - Install the Mailchimp Add-on
- In your dashboard, head to the MemberPress Menu > Add-ons. There you'll find a link to install the Mailchimp 3.0 Add-on.
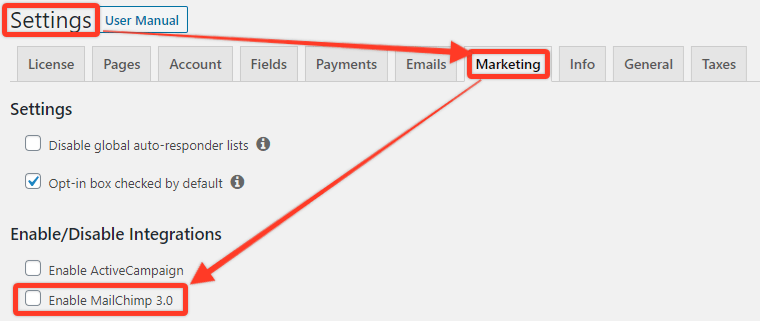
Head to the MemberPress Menu > Settings > Marketing tab. You should now see Mailchimp 3.0 listed
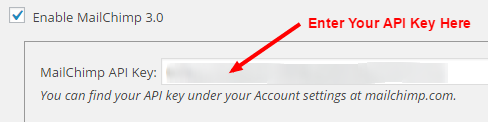
Step 2 - Input Mailchimp API Key
You'll find your API Key in your Mailchimp Account settings. Click the drop down arrow near the top right of the page where you see your Mailchimp account name. Then click on Account > Extras drop down > API keys > Your API keys section. You may need to create an API key if none is listed.
If everything checks out, you should see the "Everything's Chimpy" message.
If you receive an error saying, "Something went wrong. Double check your input" after you've entered your Mailchimp API Key correctly, this generally means that Mailchimp's API service (Akamai) is blocking your IP address as suspicious. You'll need to contact Mailchimp support to get things resolved.
Step 3 - Choose Your Audience
The Mailchimp 3.0 Integration uses only one Audience. Select the list from the option just below where you entered your API Key. This is the audience you'd like to be associated with your website members.
Step 4 - Choose Global Mailchimp Merge Tag
MemberPress will add this Tag to all new members who sign up on your site and will set its value to either "0" or "1". A value of "0" is set if a user did not check your opt-in checkbox when signing up. If you'd like to set up a special Tag for each Membership level (strongly recommended), follow Step 5 below.

Step 5 - Per Membership Merge Tags (Optional, but STRONGLY recommended)
The power of this integration comes from your ability to add a specific Merge Tag for each Membership level. We recommend that you create a "text" type Tag for each of your Memberships. MemberPress will set the value of these Tags to "active" when the member is active on that Membership, and "inactive" when the member is no longer active. This is a powerful way to create specific segments for your List and target only the customer's you want for your various marketing/news Campaigns.
To create a MERGE Tag in your Mailchimp List for each of your Membership levels, follow these instructions:
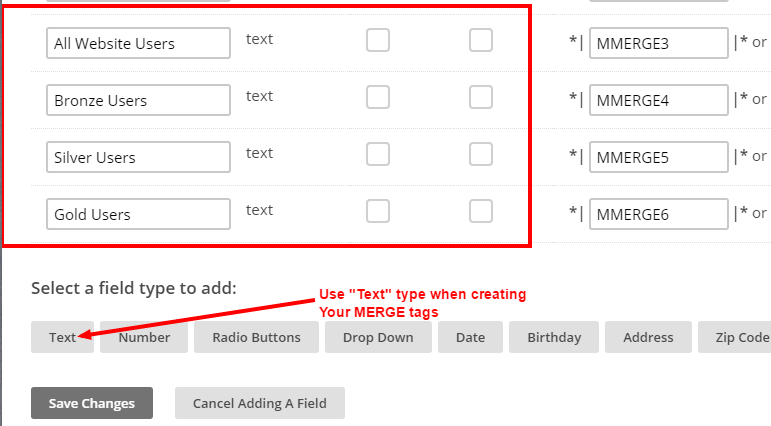
Head to your Audience fields and MERGE tags settings for the Audience. You can get here by going to the Audience tab from your Mailchimp Dashboard. Then use the dropdown option at the right of the page to select Settings. Next, click on the Audience fields and *|MERGE|* tags option. As is shown below:
Create new "Text" type fields, which are not required and are not visible. We recommend creating a global Tag (e.g., All Website Users), and other Tags for each Membership Level (e.g., Bronze, Silver, and Gold)
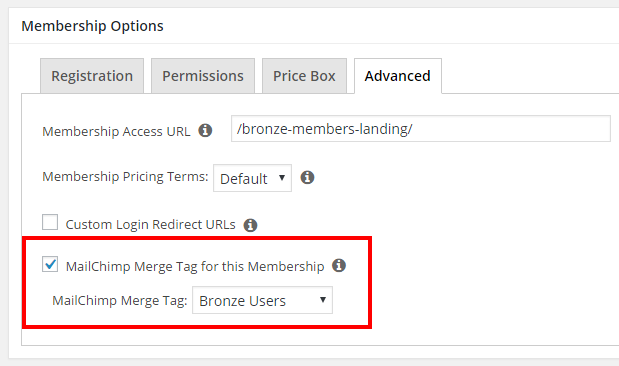
Lastly, you can specify the Tag to use for each Membership level when editing the Membership (under the Advanced tab).
Recap
MemberPress will update the value of your Membership-specific Merge Tags to active or inactive depending on the status of the member's subscription to that Membership level. You can use this information to create targeted, dynamic (auto updating) segments for your List.
MemberPress also sets a value of "1" to the global Merge Tag you have defined in the MemberPress menu > Settings > Marketing tab. This value may be set to a "0" if you have the opt-in checkbox enabled, and the user did NOT check that box when signing up. Think of the global Tag as a catch-all for every member on your site.
Send Custom Fields to Mailchimp
By default, MemberPress sends email and first and last name to Mailchimp. It also updates global merge and per membership tags. If you want to send a custom field you created in the MemberPress menu > Settings > Fields tab, you'll need to follow these steps:
Go to your WordPress Dashboard > MemberPress menu > Settings > Fields tab, and create a custom field as explained in the Creating Custom Fields section of this article. Alternatively, you can copy the slug of a custom field. In the example below the slug is mepr_company_name.

Log into your Mailchimp account, head to your Audience fields, and MERGE tags settings for the Audience. You can get here by going to the Audience tab from your Mailchimp Dashboard. Then use the dropdown option at the right of the page to select Settings, then click on the Audience fields and *|MERGE|* tags option.
Create a new "Text" type field that is not required and not visible, and has the same label as your custom field in the MemberPress menu > Settings > Fields tab. Make sure to save your changes.
NOTE: This will work only with the custom field of "Text" type, so you can't use it with dropdowns, multi-select, or any other field types.

Copy the tag under the "Put this tag in your content" column. In our case it's MMERGE9.
Go back to your WordPress Dashboard and insert the code below at the end of your theme's functions.php file, or install the WPCode plugin and add the code there (please check this article for details: How to add custom code snippets in WPCode).
add_filter('mepr-mailchimptags-add-subscriber-args', function($args, $user) {
$company = isset($_POST['mepr_company_name']) ? sanitize_text_field($_POST['mepr_company_name']) : '';
$args['merge_fields']['MMERGE9'] = $company;
return $args;
}, 10, 2);
Make sure to replace the MMERGE9 tag in the third line with the tag you copied above. You'll also need to replace both occurrences of the mepr_company_name slug in the second line with your slug from the first step.
When users sign up for a membership, MemberPress will get the value entered into the custom field and send it to Mailchimp. You'll see this value next to the new contact in your Mailchimp Audience table.

That's it. You can duplicate the steps to send as many custom fields as you want to Mailchimp! Just duplicate lines 2-3 in the code above, and replace tags, custom fields, and variable names.
You can use the same steps to send address fields to Mailchimp. The slugs for address fields are:
- mepr-address-one
- mepr-address-city
- mepr-address-country
- mepr-address-state
- mepr-address-zip
I'm confused. Help!
Shoot us an email from our support page if you need any further assistance with this integration.